

If you have spent any time in WordPress circles, you have probably heard the name Elementor thrown around like it is the solution to every web design problem known to humanity. And honestly? There is a reason for that. Elementor is a visual page builder plugin that fundamentally changed how non-developers build websites on WordPress, and it has the numbers to back up the hype.
But what exactly is it? How does it work? And more importantly, should you bother learning it? That is what this guide is for. We are going to cover the basics, walk through what you can build, and get you familiar with the editor so you can start creating with confidence.
What Elementor Actually Is
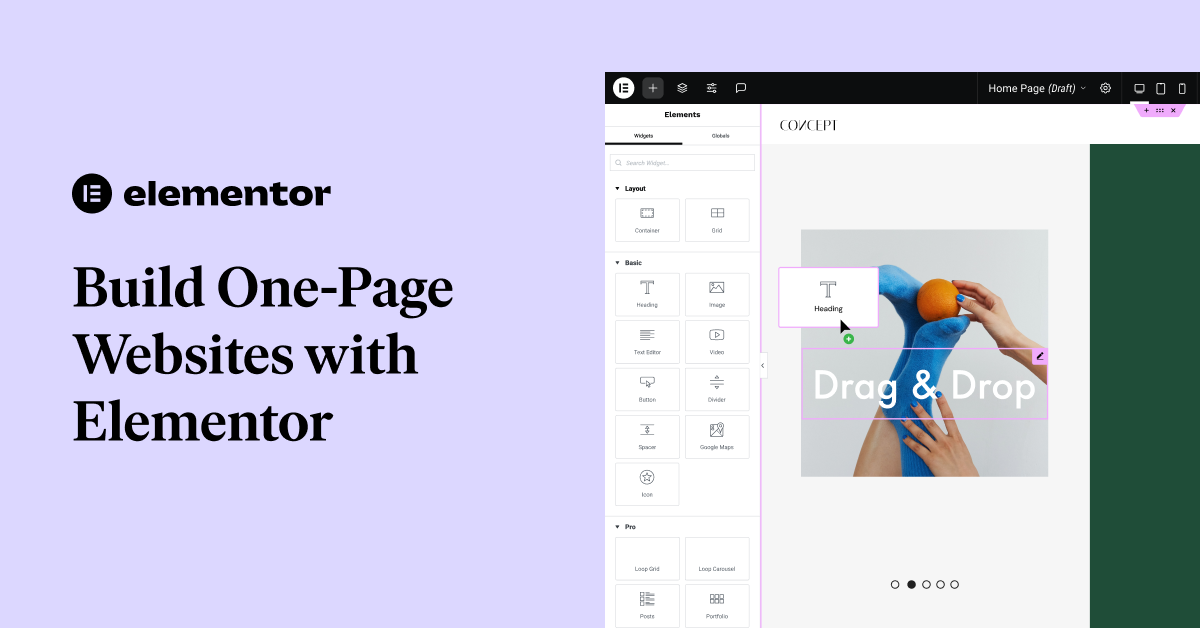
At its core, Elementor is a plugin that replaces the standard WordPress editing experience with a visual, drag-and-drop canvas. Instead of writing content in a block editor and guessing what the final result will look like, you build directly on a live preview of your page. Drag an element in, and it appears exactly where you dropped it. Change a color, and you see it update in real time. No refreshing. No switching between the editor and the front end to check your work.
This matters more than it sounds. The traditional WordPress workflow creates a disconnect between building and seeing. Elementor closes that gap entirely. What you see while editing is exactly what your visitors will see, which makes the whole process feel far less like guesswork and far more like actual design work.
The platform now has over 10 million active installs and powers roughly 13% of all WordPress websites. Among sites that use a dedicated page builder, Elementor commands somewhere between 40 and 50% of the market. That is not a niche tool with a cult following. That is the dominant option in its category by a wide margin.
What Can You Actually Build With It
Before committing time to learning any tool, it is worth asking whether it can actually handle what you need. Elementor earns its reputation here because the honest answer is: most things.
The obvious starting point is standard web pages. Your About page, your Contact page, your Services page, landing pages for specific campaigns, and any other standalone page you need. These are all straightforward in Elementor. You drag in content elements, arrange them the way you want, and the result looks professional without requiring a design background.
Bloggers get a lot of value from Elementor as well. You can design custom blog post templates so every article you publish automatically inherits a layout you have set up once. Archive pages, author profiles, category landing pages, all of these can be customized through the Theme Builder feature in Elementor Pro. Without it, these pages default to whatever your WordPress theme provides.
E-commerce sites are well covered too. The WooCommerce Builder integration in Elementor Pro lets you design product pages, shop archives, cart pages, and checkout flows that actually look like they belong to your brand. The default WooCommerce layouts are functional but generic. Elementor lets you make them yours.
Beyond those core use cases, Elementor handles popup forms, announcement bars, multi-step lead capture forms, and email subscription forms without needing separate plugins. It integrates with tools like Advanced Custom Fields for dynamic content, and it connects to email marketing platforms like MailChimp, ConvertKit, and ActiveCampaign out of the box.
The short version: if you can describe the page you want to build, Elementor can probably build it.
Installing Elementor: Simpler Than You Think
One of the things that makes Elementor approachable for beginners is how painless the setup process is. You do not need FTP access, you do not need to touch any code, and you do not need to configure anything before you can start using it.
Log in to your WordPress dashboard and hover over Plugins in the left sidebar. Click Add New. In the search field, type Elementor and press enter. The official Elementor Website Builder will appear at the top of the results with its distinctive purple icon. Click Install Now, wait a few seconds, then click Activate.
That is the entire installation process. Once activated, you will see a new Elementor menu item in your sidebar. There is an onboarding setup wizard that you can run through if you want, but it is optional. The fastest way to get familiar with the tool is to jump straight into editing a page.
Go to Pages and click Add New. Give the page any title you like, then click the Edit with Elementor button. The editor will load, and you will be looking at a blank canvas ready to build on.

A Tour of the Elementor Interface
When the editor first loads, the screen can feel like a lot. There is a panel on the left, a large preview area on the right, and a bar running across the top. Once you know what each part does, it stops feeling overwhelming and starts feeling logical.
The Widget Panel
The left panel is your toolbox. It contains every element you can add to your page, organized into categories. The Basic section is where you will spend most of your time as a beginner. It includes the Heading widget, Text Editor, Image, Video, Button, Divider, and a handful of other essentials. These are the building blocks of almost every page you will create.
Scrolling further down the panel reveals more categories. The General section includes things like Image Carousel, Google Maps, Icon Box, and Testimonial. The Pro section unlocks if you have Elementor Pro and includes more advanced widgets like the Form builder, Posts grid, and Nav Menu.
The Canvas
The large area on the right is your live preview. This is the actual page, updating in real time as you make changes. When you drop a widget onto the canvas, it appears exactly where you placed it. When you change a font size or a color, you see the result immediately. There is no save-and-preview step. The canvas is the preview.
The Top Bar
The bar at the very top of the screen holds a few important controls worth knowing early. On the left, the hamburger icon opens Site Settings, where you can configure global colors, fonts, and other site-wide defaults. In the center, you will see three device icons for desktop, tablet, and mobile. Clicking these switches the canvas to that device size so you can check how your layout looks on different screens. On the right, the blue Update button saves your work. Get into the habit of clicking it often.
The Element Settings Panel
When you click on any widget or section in the canvas, the left panel changes from the widget list to the settings for that specific element. You will see three tabs: Content, Style, and Advanced.
Content is where you edit what the element says or shows. Style is where you control how it looks: colors, fonts, borders, shadows, and spacing. Advanced is where you handle margins, padding, motion effects, and visibility rules. Almost everything you need to customize an element lives somewhere across these three tabs.
Building Your First Page
Theory is useful, but nothing beats actually building something. Let us walk through putting together a basic page section from scratch so you can feel how the editor works in practice.
Understanding the Structure
Elementor organizes pages into three layers: sections, columns, and widgets. Sections are the large containers that span the full width of your page and stack on top of each other as you scroll. Inside each section, you have columns sitting side by side. Inside those columns, you place your widgets, which are the actual content elements.
Think of it like a grid. Sections are rows. Columns divide those rows horizontally. Widgets go inside the columns.
Adding Your First Section
On a blank canvas, you will see a large plus icon in the center. Click it, and Elementor will ask you to choose a column structure for your new section. For now, select the single-column option. A section with one column will appear on your canvas, ready to receive content.
Adding a Heading
In the widget panel on the left, find the Heading widget under the Basic section. Click and drag it into your column. A default heading will drop into place, and the left panel will switch to show the heading settings. Click directly on the heading text in the canvas and type whatever you want it to say. Or edit the Title field in the settings panel on the left. Either works.
Click the Style tab in the left panel and adjust the text color, font size, and typography settings. You can select from your theme’s default fonts or choose a Google Font from the full library Elementor gives you access to.
Adding Body Text
Drag a Text Editor widget below your heading. This behaves like a simple rich text editor. Type your content, format it with bold or italics, add links, and adjust the styling using the Style tab. Nothing complicated here.
Adding an Image
Drag the Image widget below your text. Click the placeholder image that appears, and Elementor will open the WordPress media library. Upload a new image or select one you have already uploaded. Once the image is in place, use the Style tab to adjust its size, add a border radius for rounded corners, or add a box shadow if you want something with a bit more depth.
Adding a Button
Drag the Button widget below your image. In the Content tab, change the button text to something action-oriented. Set the link to wherever you want the button to take the reader. Then visit the Style tab and set the button’s background color, text color, and border radius to match your brand. You can set separate colors for the normal state and the hover state, so the button responds visually when someone mouses over it.
Once you have these four elements in place, click the Update button in the top right to save your work. Then click the small preview icon next to it to view the page as a visitor would see it. You just built your first Elementor section.
A Few Things Worth Knowing Early
Before you go further, there are a handful of habits and settings that will save you frustration down the road.
Check mobile view before you publish anything. The three device icons in the top bar are not just for show. Switch to mobile view and scroll through your page. Font sizes that look fine on desktop can be comically large on a phone. Sections with multiple columns often need adjustment when they stack on small screens. Catching these issues before publishing is far easier than fixing them after someone emails you about how broken your site looks on their phone.
Use the Revision History. Every time you save, Elementor logs a revision. If you make a change you regret, click the history icon in the bottom left of the editor and roll back to a previous version. This has saved many hours of rework. Use it freely.
Right-click on elements. Right-clicking on any section, column, or widget in the canvas opens a context menu with options like Duplicate, Copy, Paste Style, and Delete. Duplicating a section you have already styled is much faster than building a similar one from scratch.
The Navigator is your friend on complex pages. Click the map-like icon in the bottom left panel to open the Navigator. It shows a hierarchical tree of every section, column, and widget on your page. On pages with a lot of elements, this makes it easy to select something that might otherwise be hard to click on directly in the canvas.
What Comes Next
You now have a solid foundation: you know what Elementor is, what it can build, how to install it, how the interface is organized, and how to put together a basic page. That is enough to start experimenting and building real things.
The natural next step is learning how to work with Elementor’s template library, which lets you import pre-designed sections and full pages rather than building everything from scratch. You will also want to get familiar with global styles, which let you set your brand colors and fonts once so they apply consistently across your entire site. We cover both of those in part two of this guide.
For now, go build something. The best way to learn Elementor is to use it.
