

Aurora’s archive settings control how category, tag, date, search, and author pages display posts. All settings live under Layouts → Archive Layout in the Customizer and apply to every archive page on your site.
Accessing Archive Settings
- Go to Appearance → Customize.
- Open Layouts → Archive Layout.
Navigate to a category or archive page in the live preview to see changes applied in real time.
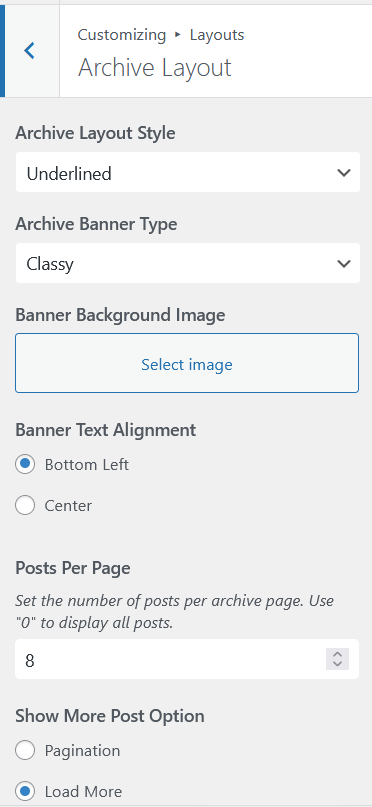
Available Settings
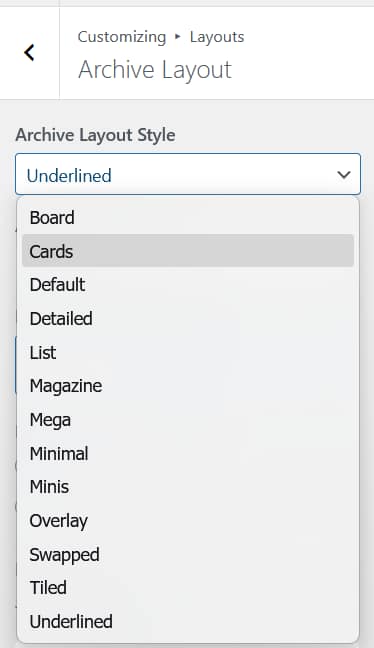
Archive Layout Style
Selects the template used for all archive pages. Aurora ships with 13 archive layouts ranging from simple lists to masonry grids and magazine-style designs.
Enable Masonry Layout
When enabled, posts are arranged in a masonry grid where cards fill available vertical space rather than sitting in fixed rows. Masonry is supported on 6 of the 13 archive layouts. On layouts that do not support it, this setting has no effect.
Posts Per Page
Sets how many posts appear per page or per load. Set to 0 to show all posts at once with no pagination. This setting overrides WordPress’s default reading setting for archive pages.
Show More Posts Option
Controls how readers move through paginated content. Two options:
- Pagination – numbered page links appear below the post grid
- Load More – a button appends the next batch of posts without a page reload
This setting only appears when Posts Per Page is set to a number greater than 0.
Sidebar
Shows or hides the sidebar on archive pages. This setting also applies to search results and author pages. See How to Show or Hide the Sidebar for more detail.
Archive Banner Type
Controls the banner that appears at the top of category, tag, and date archive pages. Three options:
- Classy – a full-width image banner with the term name and breadcrumbs overlaid in white text. A default image is provided; you can replace it using the Banner Background Image field that appears below. Use the Banner Text Alignment setting to position the text at the bottom left or centered.
- Minimal – a lightweight inline heading with the term name and breadcrumbs, styled to match your site’s typography. No image required.
- None – hides the banner entirely across all archive pages.
For more detail, including how to change the banner height, image brightness, text color, and other visual properties with CSS, see How to Customise the Archive Banner.
How the Banner Works
The Classy banner stretches full width regardless of your site width setting. The term name and breadcrumbs sit inside a constrained inner container that follows your site’s width, so the text stays aligned with your content even on wide screens. If no custom image is uploaded, Aurora falls back to a built-in default image.
The Minimal banner does not use an image. It renders inline at the top of the archive, above the post grid, and picks up your site’s typography and colors the same way.
Per-Archive Overrides
All settings above apply globally. If you need different settings for a specific category or tag – a different layout, masonry on or off, a different posts per page count, a different banner type, or a custom banner image – the Nova plugin adds override controls to the category and tag edit screens in WP Admin. Overrides set there apply to that term only and take precedence over the global settings.