

Aurora displays a banner at the top of category, tag, and date archive pages. Three banner types are available, and the Classy type accepts a custom background image and text alignment option. All controls live in the Customizer; per-category or per-tag overrides are available through Nova.
Changing the Banner Type
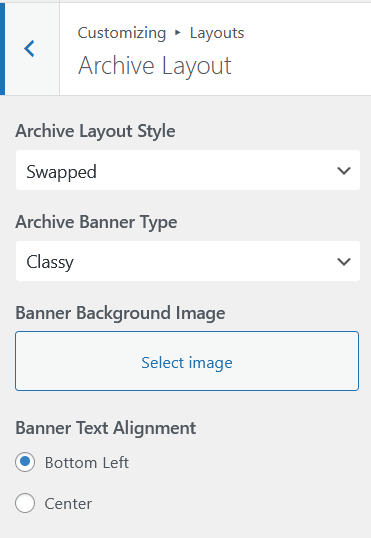
- Go to Appearance → Customize → Layouts → Archive Layout.
- Find Archive Banner Type and choose one of three options:
- Classy: a full-width image banner. The term name and breadcrumbs appear overlaid in white text. Aurora ships with a default image; you can replace it with your own.
- Minimal: an inline heading above the post grid. No image. Picks up your site’s typography and colors automatically.
- None: hides the banner entirely on all archive pages.
Uploading a Custom Banner Image (Classy Only)
When Classy is selected, a Banner Background Image field appears below the type selector. Click it to open the media library and choose or upload your image.
The banner stretches full width regardless of your site width. The text and breadcrumbs sit inside a constrained inner container that follows your site width setting, so the text stays aligned with your content on wide screens.
If no image is uploaded, Aurora falls back to its built-in default banner image.
Setting Text Alignment (Classy Only)
When Classy is active, the Banner Text Alignment setting controls where the term name and breadcrumbs sit within the banner:
- Bottom Left: text anchored to the lower-left corner of the banner (default)
- Center: text centered both horizontally and vertically

CSS Customisation
The Customizer controls cover the essentials, but you can go further with CSS. Add any of the snippets below to Appearance → Customize → Additional CSS or your child theme stylesheet.

Banner Height
The Classy banner defaults to a minimum height of 330px on desktop and 190px on mobile. To change it:
.archive-banner.classy-banner {
    min-height: 480px;
}
Image Brightness (Overlay Darkness)
Aurora adds a very light dark overlay on the Classy banner to improve text contrast. To make the image darker or lighter, override the overlay opacity:
/* Darker overlay, more contrast */
.archive-banner.classy-banner::before {
    background: rgba(0, 0, 0, 0.45);
}

/* Lighter overlay, image more visible */
.archive-banner.classy-banner::before {
    background: rgba(0, 0, 0, 0.05);
}

/* Remove overlay entirely */
.archive-banner.classy-banner::before {
    display: none;
}
You can also use a coloured tint instead of black:
.archive-banner.classy-banner::before {
    background: rgba(30, 60, 114, 0.5); /* deep blue tint */
}
Banner Title Color and Font
The h1 inside the banner is white by default. To change its color, size, or weight:
.archive-banner.classy-banner h1 {
    color: #f0e6d3;
    font-size: 3rem;
    font-weight: 800;
    letter-spacing: -0.02em;
}
For the Minimal banner, the h1 inherits your heading styles. To differentiate it:
.archive-banner.minimal-banner h1 {
    font-size: 2rem;
    color: var(--heading-color);
    border-left: 4px solid var(--link-color);
    padding-left: 16px;
}
Breadcrumb Color and Style
/* Classy banner breadcrumbs */
.archive-banner.classy-banner .arr-breadcrumbs,
.archive-banner.classy-banner .arr-breadcrumbs a,
.archive-banner.classy-banner .arr-breadcrumbs i {
    color: #ffe8c8;
    opacity: 1;
    font-size: 0.8rem;
    letter-spacing: 0.08em;
    text-transform: uppercase;
}
Text Position Adjustments
The text block sits at the bottom-left by default. To shift it up or inward, adjust the inner container padding:
/* Move text up from the bottom */
.archive-banner.classy-banner .banner-inner {
    padding-bottom: 80px;
}

/* Pull text further from the left edge */
.archive-banner.classy-banner .banner-inner {
    padding-left: 100px;
}
Banner Background Position
Aurora sets the banner image as a CSS background. To adjust which part of the image is visible:
.archive-banner.classy-banner {
    background-position: center top;    /* show the top of the image */
    background-position: center bottom; /* show the bottom */
    background-position: 50% 30%;       /* fine-tune with percentages */
}
Minimal Banner Spacing and Divider
/* Increase padding above the minimal banner heading */
.archive-banner.minimal-banner {
    padding-top: 70px;
}

/* Change the bottom divider color */
.archive-banner.minimal-banner .banner-inner {
    border-bottom-color: var(--link-color);
}
Overriding the Banner Per Category or Tag
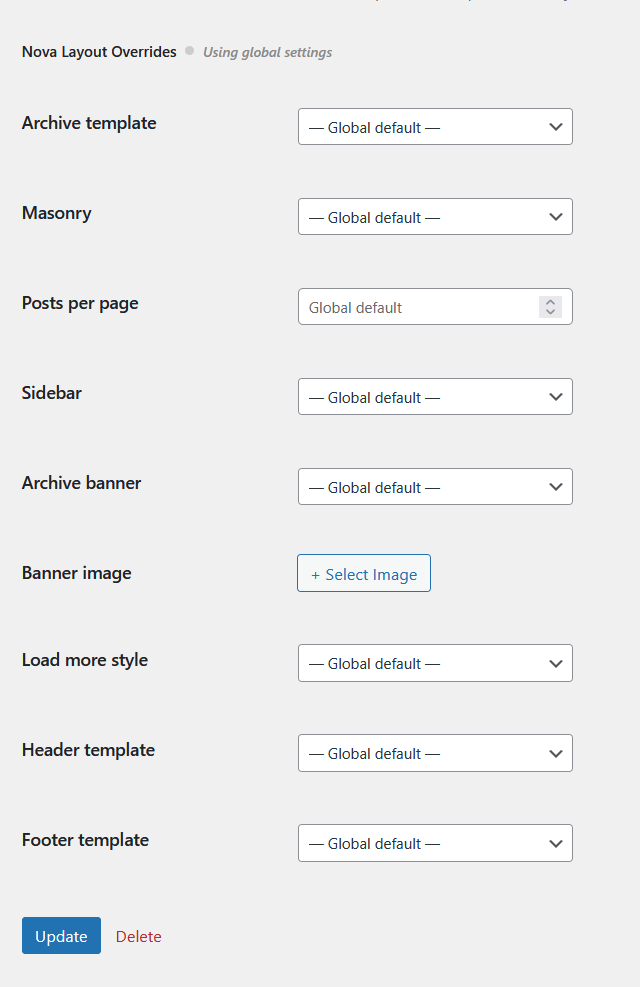
The Customizer settings above apply to all archives globally. If you want a different banner type or a different image for a specific category or tag, the Nova plugin adds override fields to the category and tag edit screens in WP Admin.
With Nova active, open any category in Posts → Categories and scroll down to find the Nova Overrides section. You can set a different banner type and upload a separate image for that term only. The global Customizer setting applies everywhere the override is not set.
The Minimal banner requires no image and works well for sites where a large image banner feels visually heavy. If you want the Classy look but only on specific high-traffic categories, set the global type to Minimal and use Nova overrides to add the Classy banner on those categories individually.